

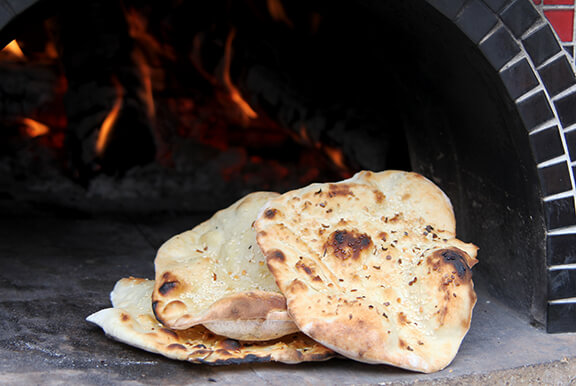
Imagine biting into warm, crusty bread with a smoky, rich flavor that only wood fire can create. You don’t need a fancy oven or years of baking experience to make this happen.
With the right recipe and a little patience, you can bake delicious wood fired bread right at home. This guide will show you simple steps to turn basic ingredients into a mouthwatering loaf that will impress your family and friends.
Ready to fill your kitchen with the irresistible smell of freshly baked bread? Keep reading, and you’ll discover how easy and rewarding wood fired bread baking can be.
Choosing The Right Wood
Choosing the right wood is key for wood fired bread baking. The type of wood impacts heat, flavor, and cooking time. Using the wrong wood can cause smoke or bad taste. It also affects how evenly the bread bakes. Understanding wood types and preparation helps you bake better bread. Let’s explore important tips and wood choices for your fire.
Types Of Wood For Baking
Hardwoods burn longer and give steady heat. Oak, maple, and hickory are popular choices. They produce mild smoke that adds flavor without bitterness. Fruit woods like apple and cherry add a sweet, light aroma. Avoid softwoods such as pine or cedar. They burn fast and release harmful resin. Choose dry, seasoned wood for best results. Fresh wood creates too much smoke and soot.
Wood Preparation Tips
Always use wood that is well-dried. It should be stored in a dry place for at least six months. Split large logs into smaller pieces for quicker burning. Remove bark to reduce smoke and sparks. Arrange wood carefully to allow good airflow. Proper burning helps maintain a steady temperature. Keep extra wood nearby to add during baking. This keeps the fire strong and consistent.

Credit: breadstoneovens.com
Preparing The Dough
Preparing the dough is the first important step in making wood fired bread. Good dough leads to bread with a nice texture and great flavor. The process starts with gathering the right ingredients. Then comes mixing and kneading to develop the dough’s structure. Finally, fermentation and proofing help the dough rise and gain taste.
Essential Ingredients
Use fresh and simple ingredients. Basic items include flour, water, yeast, and salt. Choose bread flour for better gluten development. Water temperature should be lukewarm to activate yeast. Avoid too much salt, as it can slow yeast growth. Quality ingredients make a big difference in the final bread.
Mixing And Kneading Techniques
Mix ingredients until they form a sticky dough. Use your hands or a mixer with a dough hook. Knead the dough on a floured surface for about 10 minutes. Press, fold, and stretch the dough to build strength. Proper kneading creates elasticity and air pockets for a light texture.
Fermentation And Proofing
Let the dough rest in a warm place. Cover it with a damp cloth or plastic wrap. Fermentation allows yeast to produce gases, making the dough rise. This step can take 1 to 2 hours. After the first rise, shape the dough and proof it again. Proofing adds volume and improves flavor before baking.
Setting Up The Wood Fired Oven
Setting up a wood fired oven correctly is key to baking great bread. This process takes patience and attention to detail. A well-prepared oven gives even heat and a perfect crust.
Start by preparing the fire and managing the oven’s temperature carefully. Safety is important at every step to avoid accidents.
Heating The Oven Properly
Build a strong fire inside the oven using dry, seasoned wood. Let the fire burn for at least one hour. This helps the oven walls absorb heat evenly. Spread the embers across the oven floor to heat it well.
Wait until the flames die down and only glowing embers remain. This indicates the oven is ready for baking. Check the oven walls; they should feel hot to the touch but not too hot to handle.
Managing Oven Temperature
Use an infrared thermometer to check the oven’s floor temperature. Ideal baking temperature for bread is around 450°F (230°C). Add small pieces of wood to maintain heat if the temperature drops.
Clear the oven floor of ashes before placing the bread inside. Keep the oven door closed to hold heat. Watch the temperature closely during baking to ensure steady heat.
Safety Precautions
Keep a fire extinguisher nearby in case of emergencies. Use heat-resistant gloves when handling wood or bread inside the oven. Avoid wearing loose clothing near the fire.
Make sure the oven area is clear of flammable materials. Supervise the fire at all times to prevent accidents. Always let the oven cool before cleaning or storing it.
Baking The Bread
Baking bread in a wood fired oven is a special experience. It brings out deep, smoky flavors and a crisp crust. The baking process needs care and attention. Each step affects the final bread texture and taste.
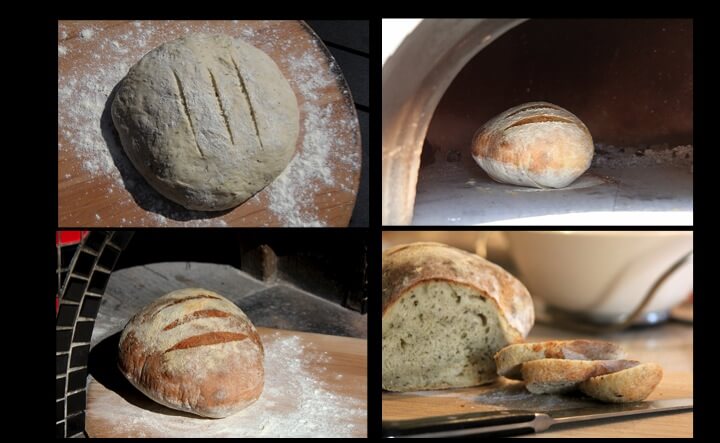
Shaping And Scoring The Dough
Start by shaping the dough into a tight ball or oval. Use your hands to create surface tension. This helps the bread rise evenly in the oven. Next, score the dough with a sharp knife or blade. Make shallow cuts on top. These cuts let steam escape during baking. They also give the bread a beautiful pattern.
Placing Bread In The Oven
Check the oven temperature before placing bread inside. The oven should be hot, around 450°F (230°C). Use a peel or a flat baking tray to slide the dough onto the oven floor. Place the bread away from direct flames but close to the heat source. This ensures even cooking and a golden crust.
Baking Time And Monitoring
Bake the bread for 25 to 35 minutes. The crust will darken and become crisp. Watch the bread closely after 20 minutes. Rotate it if one side cooks faster. Tap the bottom of the loaf to check doneness. A hollow sound means the bread is ready. Let it cool on a rack before slicing. Cooling helps set the crumb and improves flavor.
Achieving The Perfect Crust
Achieving the perfect crust on wood fired bread takes skill and attention. The crust should be crispy, golden, and full of flavor. It protects the bread inside and adds a wonderful texture. A great crust starts with controlling heat and moisture in the oven. These elements work together to create the crust’s color and crunch. Understanding how to manage steam and heat will improve every loaf.
Steam Creation Techniques
Steam plays a key role in forming a good crust. It keeps the dough surface moist during the first baking minutes. This moisture allows the crust to expand before hardening. To create steam, place a pan of water in the oven’s corner. Another way is to spray water inside the oven just after placing the dough. Some bakers throw wet wood chips onto hot coals to make steam. The steam must last for about the first 10 minutes of baking. This process helps the crust stay thin and shiny.
Controlling Crust Color And Texture
The crust color depends on the oven temperature and baking time. High heat creates a dark, crispy crust quickly. Lower heat produces a lighter, softer crust. Watch the bread closely to avoid burning. Rotate the bread during baking for even color. The type of wood used also affects flavor and color. Hardwoods like oak and maple burn hotter and longer. Softwoods burn faster and can leave a smoky taste. Adjust baking time to get the crust just right. A perfect crust is golden brown with small cracks. It should sound hollow when tapped.
Credit: www.fornobravo.com
Enhancing Flavor
Enhancing the flavor of wood-fired bread is a key part of the baking experience. The unique heat and smoke from the wood oven add depth and richness to the bread’s taste. Small additions like herbs and seeds also play a big role in boosting flavor. These elements make the bread not just food but a sensory delight.
Wood Smoke Impact
Wood smoke gives bread a distinct, earthy aroma. It seeps into the crust and crumb, creating a subtle smoky taste. Different woods, like oak or fruit trees, offer varied flavors. This natural flavor cannot be replicated by conventional ovens. The smoke also enhances the bread’s texture, making the crust crispier and more flavorful.
Adding Herbs And Seeds
Herbs like rosemary, thyme, or oregano add fresh, fragrant notes to the bread. Mixing seeds such as sesame, sunflower, or flaxseed brings crunch and nuttiness. These ingredients blend well with the smoky flavor from the wood fire. They also add visual appeal and extra nutrition. Sprinkling them on top or mixing them into the dough works well.
Troubleshooting Common Issues
Troubles with wood fired bread can be tricky. Small mistakes change the bread’s taste and texture. Understanding common problems helps fix them fast. This guide covers three key issues: burnt crust, dense bread, and undercooked centers. Each section gives clear tips for better bread.
Avoiding Burnt Crust
Burnt crust often means the oven is too hot. Check the fire’s heat before baking. Use a thermometer if possible. Move bread away from direct flames. Place it on a cooler part of the oven floor. Rotate the bread during baking for even heat. Cover bread with foil if crust browns too fast.
Preventing Dense Bread
Dense bread shows under-risen dough or heavy flour use. Measure ingredients carefully. Use fresh yeast and warm water to help rise. Knead dough well for good gluten. Let dough rest longer before baking. Avoid adding too much flour. Dough should feel soft and slightly sticky.
Fixing Undercooked Centers
Undercooked centers mean bread needs more time or less heat. Lower oven temperature slightly. Bake bread longer without burning the crust. Use a skewer or toothpick to check inside. It should come out clean. Let bread cool on a rack to finish cooking inside. Avoid cutting bread too soon after baking.
Storing And Serving Tips
Storing and serving wood fired bread properly keeps its fresh taste and texture. Good storage stops bread from drying out or going stale too fast. Serving it right brings out its full flavor and makes every bite enjoyable.
Best Storage Methods
Wrap the bread in a clean cloth or paper bag. Avoid plastic bags because they trap moisture and soften the crust. Store bread at room temperature, away from heat and sunlight. For longer storage, slice the bread and freeze it in airtight bags. Toast slices straight from the freezer for a fresh taste.
Serving Suggestions
Serve wood fired bread warm to enjoy its crispy crust. Cut thick slices to hold toppings well. Pair with olive oil, butter, or fresh cheese. Use it for sandwiches or as a side with soups and salads. Toast leftovers to restore crunch and flavor. Simple and tasty ways to enjoy your bread.
Credit: www.fornobravo.com
Frequently Asked Questions
What Ingredients Are Needed For Wood Fired Bread?
You need flour, water, yeast, salt, and sometimes sugar or oil. Quality ingredients ensure better flavor and texture.
How Do You Control Temperature In A Wood Fired Oven?
Maintain a steady fire and use an infrared thermometer. Ideal baking temperature is around 450°F to 500°F (232°C to 260°C).
How Long Does Wood Fired Bread Take To Bake?
Baking time usually ranges from 20 to 30 minutes. It depends on oven heat and bread size.
Can Wood Fired Bread Be Made Without A Professional Oven?
Yes, you can use a homemade or backyard wood fired oven. Proper heat management is key for good results.
Conclusion
Baking wood fired bread brings warmth and flavor to your kitchen. The smoky taste and crispy crust make each bite special. Simple ingredients and patience create great results. This recipe invites you to enjoy fresh, homemade bread. Try it, and share the joy with family or friends.
Fresh bread straight from the oven—hard to beat. Give it a go and savor every slice.