

If you’ve ever wanted to create your own Viking mead at home, this recipe for 1 gallon is exactly what you need. Imagine sipping a rich, honeyed drink that’s been enjoyed for centuries by fierce warriors and storytellers alike.
Making your own mead isn’t as hard as you might think, and with the right steps, you can craft a delicious brew that’s uniquely yours. Keep reading, and you’ll discover how simple ingredients and easy instructions come together to make a drink that’s both historic and satisfying.
Your Viking mead adventure starts here!

Credit: www.growforagecookferment.com
Ingredients For Viking Mead
Crafting Viking mead requires the right ingredients. Each one shapes the final taste and quality. Choosing carefully helps create a rich, authentic drink. This guide covers essential components for a 1-gallon batch of Viking mead.
Understanding the role of each ingredient makes the process easier and more rewarding. Let’s explore the key elements needed for your mead.
Honey Selection
Honey is the heart of mead. Use raw, unfiltered honey for best flavor. Wildflower or clover honey works well. Avoid honey with strong, overpowering tastes. The type of honey affects sweetness and aroma.
Water Quality
Water makes up most of the mead. Use clean, fresh water without chlorine. Spring water or filtered tap water is ideal. Good water ensures a smooth, clean taste. Poor water can spoil the mead’s flavor.
Yeast Choice
Yeast turns honey into alcohol. Select yeast that suits mead brewing. Champagne yeast or specific mead yeast strains work best. Proper yeast helps control fermentation speed and taste. Healthy yeast leads to a better final product.
Optional Flavor Additions
Spices and fruits add character to mead. Common choices include cinnamon, cloves, and orange peel. Berries or herbs can give unique notes. Use small amounts to enhance, not overpower. Experiment with flavors to find your favorite blend.
Credit: www.growforagecookferment.com
Equipment Needed
Making Viking mead at home requires a few key tools. These tools help keep the process clean and safe. They also make sure your mead ferments properly. Using the right equipment improves your chances for a tasty result.
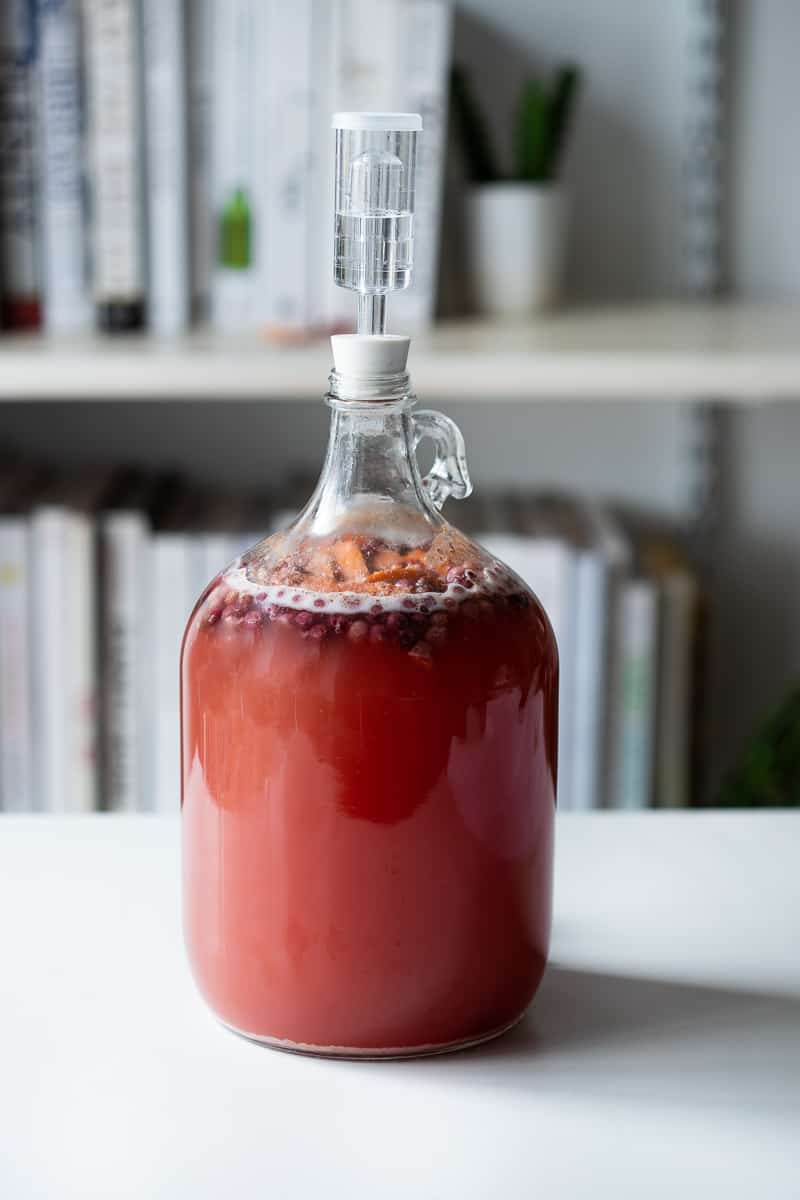
Fermentation Vessel
A fermentation vessel holds your mead during fermentation. A one-gallon glass carboy or food-grade plastic bucket works well. Glass is easy to clean and does not react with the mead. Make sure the vessel has enough space for bubbling and foam.
Airlock And Stopper
An airlock fits into the stopper to seal the vessel. It lets gases escape without letting air in. This prevents contamination and keeps your mead safe. Use a stopper that fits snugly in your vessel’s opening.
Sanitization Tools
Sanitizing your tools is critical to avoid bad bacteria. Use a no-rinse sanitizer designed for brewing. Clean all equipment that touches the mead, including spoons and measuring cups. Proper sanitization protects flavor and quality.
Measuring Instruments
Accurate measurement helps create balanced mead. Use a kitchen scale to weigh honey precisely. A hydrometer checks the sugar level in the must before fermentation. A thermometer monitors the temperature during fermentation.
Preparing The Must
Preparing the must is a key step in making Viking mead. This stage sets the base for good fermentation and flavor. The must is a mix of honey, water, and nutrients. It feeds the yeast and helps create the mead’s taste. Proper preparation ensures a smooth brewing process and a tasty final product.
Mixing Honey And Water
Start by pouring your honey into a clean container. Warm water helps dissolve honey faster but keep it under 110°F. Mix the honey and water well until fully combined. Stir gently to avoid adding air. This creates a smooth, uniform liquid called must.
Adjusting Specific Gravity
Check the must’s specific gravity with a hydrometer. This measures sugar levels in the mix. For Viking mead, aim for a gravity around 1.100 to 1.120. If it’s too high, add water slowly. If too low, add more honey carefully. Accurate gravity helps control alcohol content and sweetness.
Adding Nutrients
Yeast needs nutrients to work well. Add yeast nutrient or energizer to the must. Follow package instructions for the right amount. Mix thoroughly to spread nutrients evenly. Proper nutrition boosts yeast health and speeds up fermentation.
Fermentation Process
The fermentation process is the heart of making Viking mead. This step turns sweet honey into a rich, flavorful drink. Careful attention during fermentation helps create the perfect taste and aroma. It takes patience and some simple techniques to get it right.
Pitching The Yeast
Start by adding yeast to the honey mixture. Use the right yeast amount for one gallon of mead. Sprinkle yeast gently over the liquid surface. Let it sit for a few minutes to absorb moisture. Then stir the yeast into the must to mix well. Yeast begins eating sugars and making alcohol.
Temperature Control
Keep the mead at a steady temperature. Ideal range is between 60°F and 75°F (15°C to 24°C). Avoid sudden temperature changes. Warm spots can speed up fermentation too much. Cold spots can slow it down or stop it. Use a thermometer to check regularly. A stable temperature helps yeast work best.
Monitoring Fermentation
Watch the mead closely over days and weeks. You will see bubbles forming on the surface. This means yeast is active and working. Use a hydrometer to measure sugar levels. When the reading stays the same for a few days, fermentation is done. Clear liquid shows yeast has settled. At this point, you can move to the next step.
Racking And Aging
Racking and aging are key steps in making Viking mead. They help improve the flavor and clarity. These processes remove unwanted particles and allow the mead to develop rich tastes over time. Paying close attention here can make a big difference in your final batch.
Transferring Mead
Transferring, or racking, means moving mead from one container to another. This step helps separate clear mead from leftover sediment. Use a siphon tube to avoid stirring up the sediment. Keep the mead away from air exposure to prevent oxidation. Clean equipment is essential to avoid contamination.
Clarification Techniques
Clarifying mead makes it look clean and bright. You can use fining agents like bentonite or gelatin to clear particles. Another method is cold crashing, which means chilling the mead to force solids to settle. Patience is important here. Clear mead tastes better and looks more inviting.
Aging Duration
Aging allows flavors to blend and mellow. Mead usually needs several months to a year of aging. Store the mead in a cool, dark place. Check it occasionally but avoid unnecessary exposure to air. The longer the mead ages, the smoother and richer it becomes.
Bottling And Storage
Bottling and storage are key steps in making Viking mead at home. Proper care here keeps your mead fresh and tasty. It also stops any spoilage and helps the flavors develop well. Follow these simple steps to bottle and store your one-gallon batch perfectly.
Sanitizing Bottles
Clean bottles prevent bacteria and wild yeast from spoiling your mead. Use a sanitizer made for brewing or a mix of water and bleach. Rinse bottles well with hot water after sanitizing. Make sure no residue or smell remains. Let bottles dry before filling them with mead.
Sealing And Labeling
Seal bottles tightly with caps or corks to keep air out. Air can cause oxidation and spoil your mead’s taste. Label each bottle with the date and batch name. This helps track aging time and identify flavors later. Use waterproof labels or write with a permanent marker.
Ideal Storage Conditions
Store mead bottles in a cool, dark place. Avoid sunlight and heat, which damage the mead’s quality. A steady temperature between 50 and 60°F (10-15°C) works best. Keep bottles lying down if using corks to keep them moist. Proper storage helps your Viking mead age smoothly and taste better over time.
Tips For Authentic Viking Flavor
Crafting a Viking mead recipe that tastes true to history needs careful choices. Small details make a big difference in flavor and aroma. Use these tips to give your 1-gallon batch an authentic Viking touch.
Traditional Spice Additions
Vikings loved spices that were easy to find in their region. Common ones include cinnamon, cloves, and ginger. Adding a small amount of these spices creates a warm, rich taste. Use crushed spices to release more flavor. Add them during fermentation for best results. Avoid using too much; it can overpower the honey’s natural sweetness.
Honey Varietals For Taste
Choose honey types that match Viking landscapes. Wildflower honey works well for a floral note. Heather honey adds a slightly bitter, earthy flavor. Linden honey offers a light, citrus hint. Mixing two kinds of honey can create depth. Always use raw, unpasteurized honey to keep natural enzymes and flavors.
Serving Suggestions
Serve Viking mead slightly chilled or at room temperature. Use wooden cups or simple glassware to keep the old-world feel. Pair mead with smoked meats, cheeses, or hearty bread. Drinking mead during storytelling or celebrations captures the Viking spirit. Store leftovers in a cool, dark place to keep taste fresh.

Credit: distantmirror.wordpress.com
Frequently Asked Questions
What Ingredients Are Needed For Viking Mead 1 Gallon?
You need honey, water, yeast, and optional spices like cinnamon or cloves. Use quality honey for best flavor. Cleanliness is crucial to avoid contamination. Yeast choice affects fermentation and taste. Optional additives can enhance traditional Viking flavors.
How Long Does Viking Mead Fermentation Take?
Fermentation usually takes 4 to 6 weeks. Primary fermentation lasts about 2 to 3 weeks. Secondary fermentation can extend for 2 to 3 more weeks. Patience is key for flavor development. Temperature control improves fermentation quality.
Can I Use Wild Yeast For Viking Mead?
Yes, wild yeast can ferment Viking Mead. It may produce unique, rustic flavors. However, it’s less predictable than cultured yeast. Sanitation and monitoring are important to avoid spoilage. Wild yeast offers traditional Viking mead authenticity.
What Is The Ideal Honey-to-water Ratio?
A common ratio is 3 pounds of honey per gallon of water. This balances sweetness and fermentation ease. Adjust ratio for drier or sweeter mead. More honey increases alcohol content but slows fermentation. Consistency ensures good mead quality.
Conclusion
This Viking mead recipe makes one gallon of tasty drink. It uses simple ingredients anyone can find. The steps are easy to follow and fun to do. You can enjoy this mead at home or share with friends. Patience is key; let it ferment well.
Soon, you will taste a sweet, smooth mead. Try this recipe to bring a bit of history to your glass. Mead-making is a great hobby for beginners and experts alike. Give it a try and enjoy the unique flavors.