

If you love tender, juicy meat that melts in your mouth, this Sous Vide Short Rib Recipe is made just for you. Imagine biting into perfectly cooked ribs, full of rich flavor and cooked to perfection every single time.
Whether you’re a beginner or an experienced cook, this method will change how you prepare short ribs forever. Keep reading to discover how easy it is to achieve restaurant-quality results right in your own kitchen. Your next meal will be unforgettable.
Choosing The Right Short Ribs
Picking the perfect short ribs is key for a tasty sous vide dish. The right cut affects texture and flavor. Knowing what to choose helps you cook ribs that are tender and juicy. It also saves time and effort in the kitchen.
Understanding the types of short ribs and how to select good quality meat is important. This guide makes it simple to find the best ribs for your recipe. Let’s explore the options and tips for choosing the right short ribs.
Types Of Short Ribs
Short ribs come in different types based on the cut. Plate short ribs are common and have a good amount of fat. Flanken short ribs are sliced thin across the bone. English cut ribs are thick and perfect for slow cooking. Each type offers a unique texture and flavor for sous vide cooking.
Selecting Quality Meat
Choose ribs with bright red color and firm texture. Look for marbling, the small fat streaks inside the meat. Marbling adds flavor and keeps ribs moist. Avoid ribs with dry edges or a strong smell. Fresh, well-marbled ribs cook best in sous vide for tender results.

Credit: steakschool.com
Preparing Short Ribs For Sous Vide
Preparing short ribs for sous vide is the first step to tender, flavorful meat. Proper preparation helps the ribs cook evenly. It also enhances the taste and texture. Pay attention to trimming and seasoning before sealing the meat. These steps set the foundation for a great sous vide short rib recipe.
Vacuum sealing is important to keep the meat fresh and juicy. It prevents water from entering the bag during cooking. Careful sealing ensures the ribs cook perfectly in the water bath.
Trimming And Seasoning
Start by trimming excess fat and silver skin from the ribs. Too much fat can make the meat greasy. Remove any tough, chewy parts for better texture. Season the meat with salt, pepper, and your favorite spices. Use a simple mix to let the beef flavor shine. Rub the seasoning evenly on all sides. This step adds depth and richness to the ribs.
Vacuum Sealing Techniques
Place the seasoned ribs in a vacuum bag. Arrange them in a single layer for even cooking. Use a vacuum sealer to remove all air from the bag. Make sure the seal is tight and secure. Double-check for leaks before cooking. Proper sealing prevents water from touching the meat. It also keeps the juices locked inside. This helps the ribs stay moist and tender during sous vide cooking.
Sous Vide Cooking Process
Sous vide cooking is a gentle and precise way to cook short ribs. It uses a water bath to cook food evenly. This method keeps the meat tender and juicy. The slow, controlled heat breaks down tough fibers without drying the meat.
Using sous vide means you can cook short ribs to the exact doneness you want. The process involves sealing the ribs in a bag and cooking them in warm water. This gives consistent results every time.
Optimal Temperature And Time
Set the water temperature between 131°F and 185°F. Lower temperatures give a medium-rare finish. Higher temperatures create a more tender, fall-apart texture.
Cook short ribs for 24 to 48 hours. Longer cooking times make the meat softer. Shorter times keep the ribs firmer but still tender.
Choose the time and temperature based on your texture preference. This flexibility is one of sous vide’s best features.
Using Sous Vide Equipment
Start with a reliable sous vide machine. It keeps water at a steady temperature. Use a large container to hold the water bath.
Place the seasoned short ribs in a vacuum-sealed bag. Remove all air to prevent floating. Submerge the bag fully in the water.
Check the machine regularly to keep water at the set temperature. After cooking, quickly sear the ribs for a nice crust.
Credit: steakschool.com
Finishing Techniques
Finishing techniques are key to perfect sous vide short ribs. They bring out the rich flavors and create a great texture. After slow cooking, these steps add the final touch.
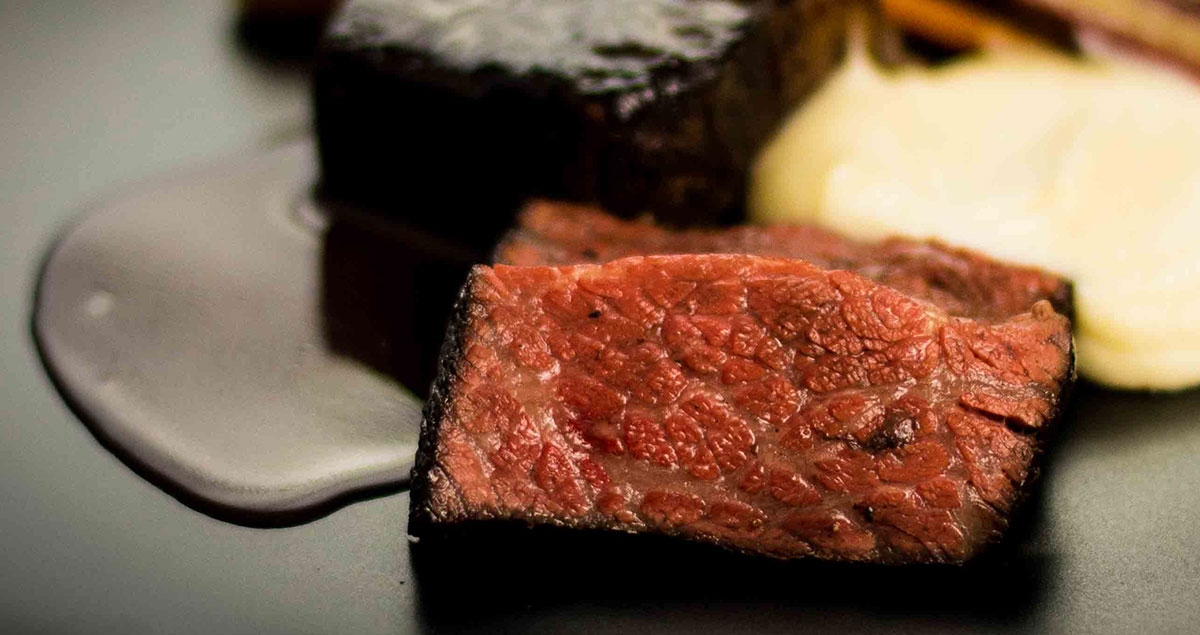
Searing For Flavor And Texture
Searing short ribs after sous vide cooking adds a crispy, brown crust. This crust gives a deep flavor and a nice texture contrast. Use a hot pan with a little oil. Press the ribs gently to get even contact. Sear each side for about one to two minutes. Avoid overcrowding the pan to keep the heat high. This step makes the ribs look and taste more appealing.
Resting Before Serving
Resting the ribs after searing lets the juices settle inside. This keeps the meat tender and juicy. Place the ribs on a plate and cover loosely with foil. Let them rest for five to ten minutes. This short wait improves the eating experience. The meat stays moist and soft with every bite.
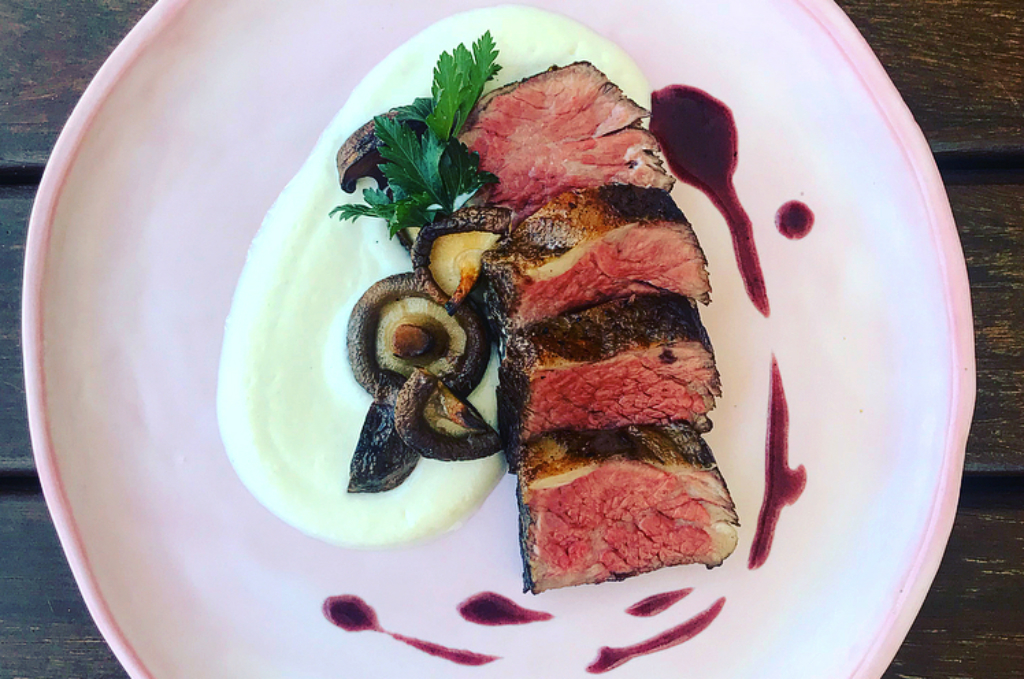
Serving Suggestions
Serving sous vide short ribs is a special moment. The right sides and sauces make each bite better. Choose options that bring out the rich, tender flavor of the meat. Simple, fresh, and tasty choices work best. This way, every part of the meal shines.
Side Dishes That Complement
Creamy mashed potatoes are a classic match. Their smooth texture pairs well with the soft ribs. Roasted vegetables add color and a slight crunch. Think carrots, Brussels sprouts, or green beans. A fresh salad with a light vinaigrette cuts through the richness. Rice pilaf or buttered noodles also balance the meal nicely.
Sauce Pairings
A rich red wine reduction deepens the flavor of the ribs. Barbecue sauce adds a smoky, sweet touch. Horseradish cream gives a sharp, spicy contrast. Mushroom gravy brings earthiness and warmth. Choose sauces that highlight the meat without overpowering it.
Troubleshooting Tips
Sous vide short ribs turn out tender and juicy when done right. Still, mistakes happen. Troubleshooting helps fix common problems fast. Understanding key issues improves your cooking results every time.
Avoiding Overcooking
Short ribs cook slowly at low temperatures. Overcooking makes them mushy and less tasty. Use a reliable thermometer to set the right temperature. Stick to the recommended cooking time. Avoid leaving ribs in the water bath too long. Remove the ribs as soon as they reach the desired texture. Cooling the ribs quickly stops the cooking process.
Fixing Texture Issues
Sometimes ribs turn out tough or dry. This means the meat fibers did not break down properly. Check if the bag was sealed correctly to keep moisture inside. Ribs may need more cooking time at a lower temperature. After sous vide, sear ribs quickly on high heat for a nice crust. Rest the meat before cutting to keep juices locked in. Using quality short ribs also improves texture.
Credit: recipes.anovaculinary.com
Frequently Asked Questions
What Is The Best Temperature For Sous Vide Short Ribs?
The ideal temperature for sous vide short ribs is 131°F to 135°F for medium-rare. Cooking at this range ensures tender, juicy meat with a perfect texture.
How Long Should I Cook Short Ribs Sous Vide?
Cook short ribs sous vide for 24 to 48 hours. Longer cooking times break down collagen, making the meat incredibly tender and flavorful.
Can I Sous Vide Short Ribs Without A Vacuum Sealer?
Yes, you can use a heavy-duty ziplock bag and water displacement method. Just ensure all air is removed to maintain proper cooking.
Should I Sear Short Ribs After Sous Vide Cooking?
Searing short ribs after sous vide adds a flavorful crust. Use a hot pan or grill to brown the meat quickly.
Conclusion
Sous vide short ribs cook slowly to become tender and juicy. This recipe makes the meat soft and full of flavor. You only need simple ingredients and a sous vide machine. Serve it with your favorite sides for a complete meal.
Try it once, and you will want to make it again. Perfect for family dinners or special occasions. Cooking meat this way saves time and effort. Enjoy a delicious meal with little stress. Give this recipe a try soon!