

Are you looking for a fun and creative way to bring a touch of nature into your kitchen? The wood cookie mold recipe is exactly what you need.
Imagine making delicious treats that look like rustic wooden slices—perfect for impressing your friends or enjoying a cozy moment yourself. You’ll discover easy steps to create these unique cookies that are as delightful to make as they are to eat.
Ready to turn your baking into a charming, nature-inspired experience? Keep reading to unlock the secrets of the wood cookie mold recipe.
Credit: treefruitresearch.org
Ingredients For Wood Cookie Mold
Creating a wood cookie mold requires specific ingredients to get the best results. Each ingredient plays a role in shaping and hardening the mold. Knowing these ingredients helps you prepare the perfect mix for your wood cookie project.
Using the right ingredients ensures your mold is durable and easy to use. Let’s explore the essential components that make up a wood cookie mold.
Essential Dry Ingredients
Flour is a basic ingredient that gives structure to the mold. Cornstarch helps to make the mold smooth and flexible. Baking soda acts as a mild raising agent, improving texture. You also need fine sawdust to add a natural wood feel and texture. Mixing these dry ingredients well is key for a strong mold.
Wet Ingredients
Water is the main liquid that binds all dry ingredients together. White glue or craft glue helps to hold the mixture firmly. A small amount of glycerin can be added to keep the mold soft and flexible. Stir these liquids carefully to avoid lumps and create a smooth mix.
Optional Add-ins
Essential oils add a fresh scent to your wood cookie mold. Food coloring can give your mold a unique look. Small amounts of glitter or natural dyes can enhance the appearance. These add-ins are optional but make your mold more interesting and personalized.
Tools And Equipment Needed
Making wood cookie molds requires specific tools and equipment. Having the right items makes the process easier and the results better. Prepare your workspace with care. Organize your tools before starting. This saves time and avoids mistakes.
Choosing The Right Mold
Select a mold that fits your cookie size needs. Silicone molds work best for easy release. Look for molds with clear shapes and details. Avoid molds that are too shallow or too deep. A good mold creates sharp, clean cookie edges.
Mixing Bowls And Utensils
Use medium to large bowls for mixing your dough. Plastic or glass bowls work well. Choose utensils like spatulas and wooden spoons. These help mix ingredients evenly. Have a small bowl ready for wet ingredients. Keep your tools clean and dry before use.
Baking Setup
Prepare a flat, clean surface for baking. Use baking sheets lined with parchment paper. This prevents cookies from sticking. Preheat your oven to the correct temperature. Use an oven thermometer for accuracy. Have cooling racks ready to cool cookies quickly.
Preparing The Dough
Preparing the dough is the first step in making perfect wood cookie molds. This process sets the base for shaping and baking. A good dough is easy to work with and holds the shape well. It should not be too sticky or too dry. Following clear steps helps create the best dough for your cookies.
Measuring Ingredients Accurately
Use a kitchen scale or measuring cups for precision. Accurate measurements keep the dough balanced. Too much flour makes the dough hard. Too little flour makes it sticky. Measure all ingredients carefully before mixing.
Mixing Techniques
Combine dry ingredients first for even distribution. Slowly add wet ingredients to the dry mix. Stir gently using a wooden spoon or spatula. Avoid overmixing to keep the dough soft. Mix just until ingredients come together.
Achieving The Right Consistency
The dough should feel smooth and slightly firm. It must hold its shape without cracking. If too dry, add a few drops of water. If too wet, sprinkle a bit of flour. Test by pressing the dough lightly with fingers.
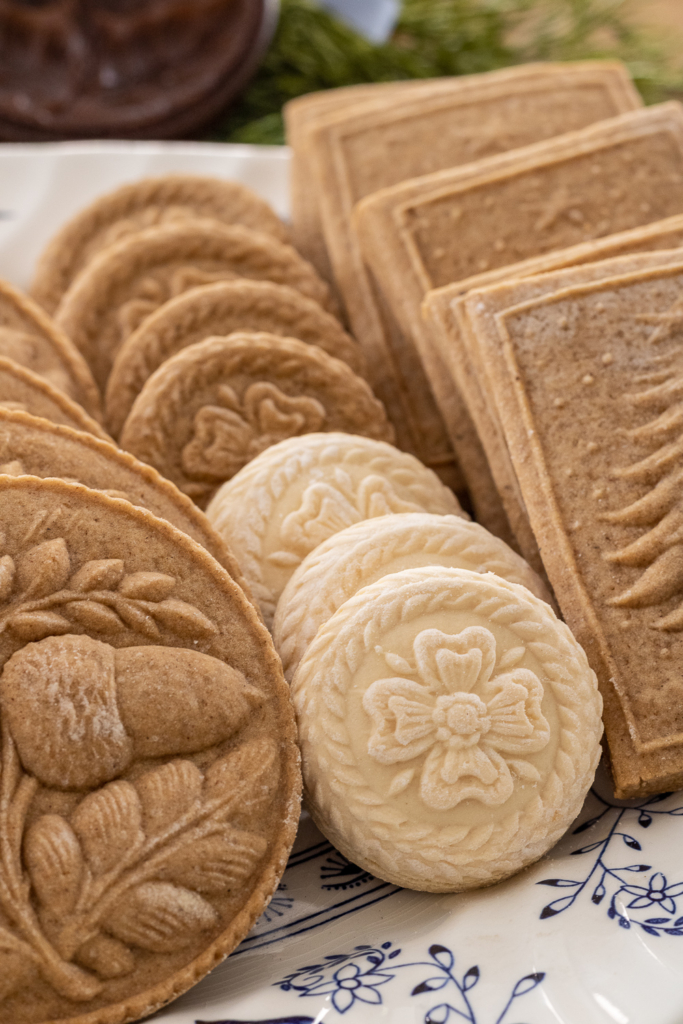
Shaping Cookies With Wood Molds
Shaping cookies with wood molds adds a special touch to your baking. These molds create beautiful patterns and shapes on the cookies. They help you make treats that look both traditional and charming. Using wood molds is simple once you know the steps.
Pressing Dough Into The Mold
Start with chilled dough for best results. Lightly flour the mold to stop sticking. Press the dough firmly into the mold’s design. Make sure to fill every detail and corner. Use even pressure to create a clear pattern. Carefully scrape off extra dough from the edges. This step shapes the cookie perfectly for baking.
Releasing Shaped Cookies
Gently tap the mold to loosen the dough. Slowly lift the mold from the dough. If stuck, use a small knife to loosen edges. Place the shaped cookie on a baking sheet. Keep the pattern intact while moving it. Repeat the process for each cookie. This careful handling keeps shapes sharp and pretty.
Maintaining Mold Quality
Clean the wood mold after every use. Avoid soaking it in water to prevent damage. Use a soft brush to remove dough bits. Dry the mold completely before storing it. Apply a thin layer of food-safe oil now and then. Proper care keeps the mold strong and ready for next baking. This extends the mold’s life and quality.
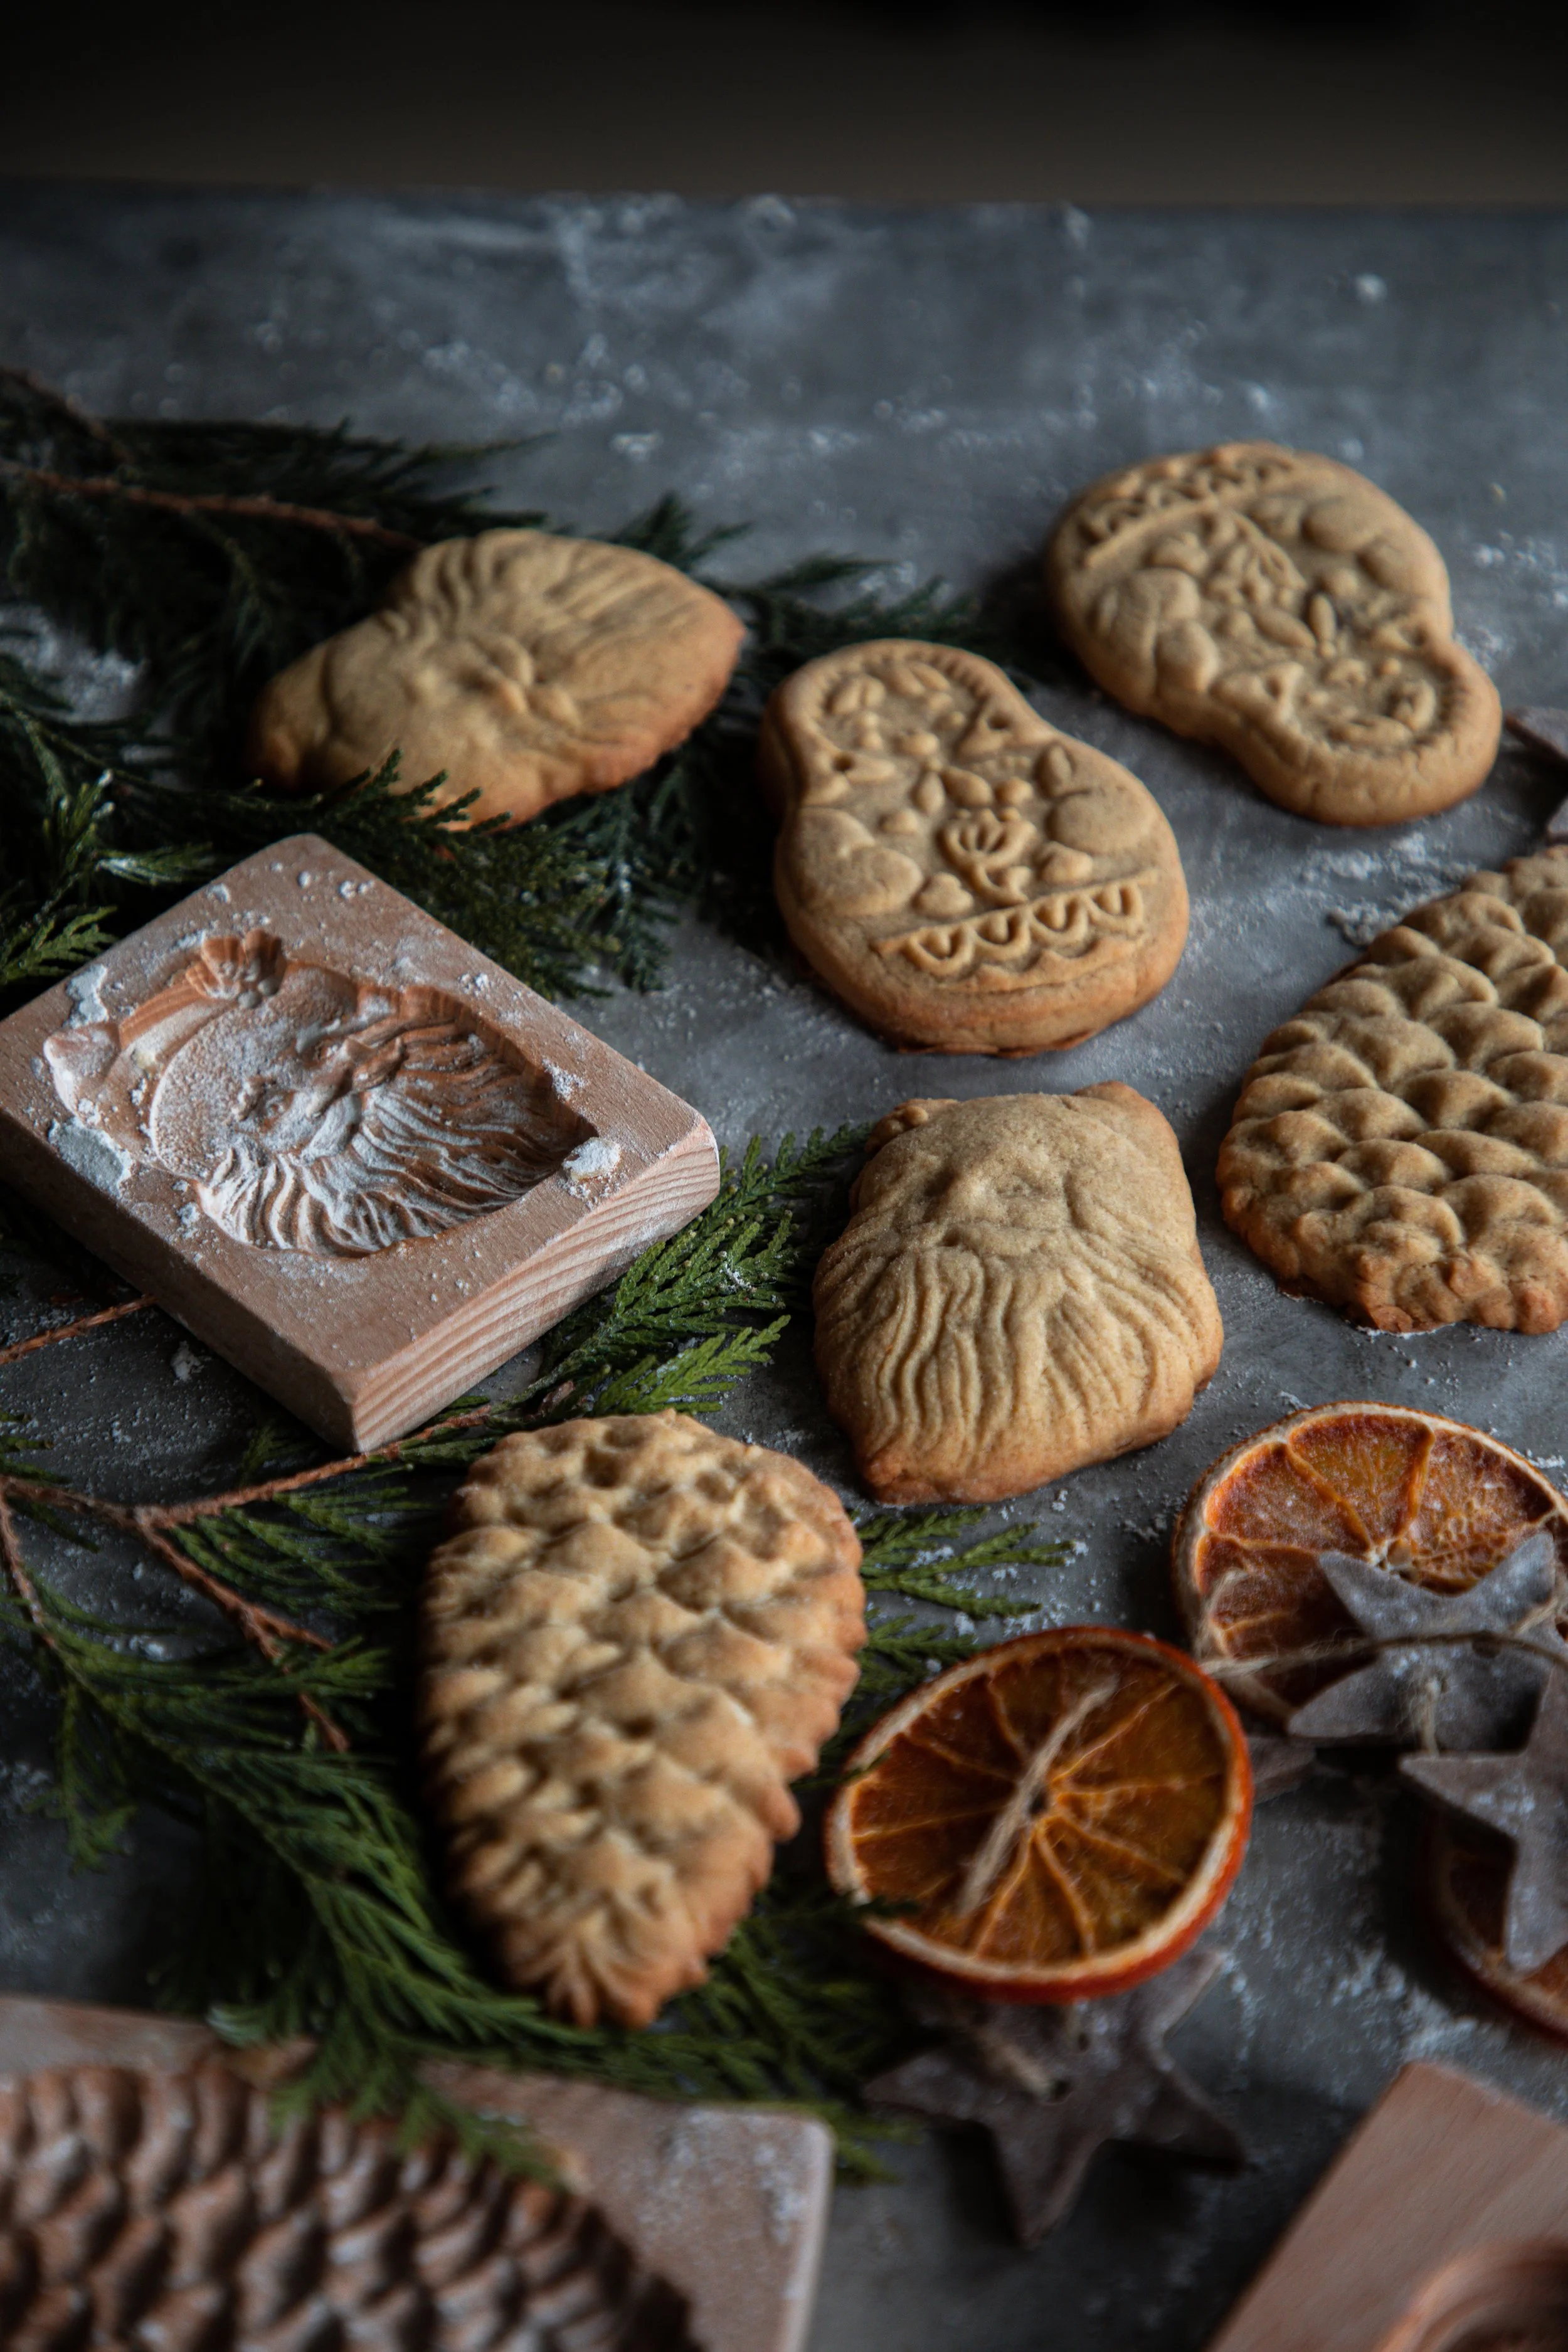
Baking Tips For Rustic Texture
Creating a rustic texture in wood cookie molds depends on careful baking. The right oven temperature, baking time, and how you handle the cookies after baking are very important. These tips help you get that natural, rough look and a perfect crisp outside.
Optimal Oven Temperature
Set your oven between 325°F and 350°F for the best results. Too high heat can burn the edges fast. Too low heat will make the cookies soft and pale. This temperature range helps create a slight crackle on the surface, giving a rustic feel.
Baking Time Guidelines
Bake the wood cookie molds for about 12 to 15 minutes. Watch closely after 10 minutes to avoid overbaking. The edges should be golden brown but not dark. A little uneven coloring adds to the natural look you want.
Cooling And Handling
Let the cookies cool on the baking sheet for 5 minutes. This helps them firm up without breaking. Transfer them carefully to a wire rack to cool completely. Handle gently to keep the rough, wood-like texture intact.

Credit: www.alewyfe.com
Decorating Rustic Wood Cookies
Rustic wood cookies offer a charming base for creative decorating. Their natural look pairs well with simple, earthy designs. Decorating these cookies brings out their unique texture and warmth.
Use easy techniques to enhance their rustic appeal. Focus on natural colors and subtle details. This approach keeps the design fresh and inviting.
Natural Icing Ideas
Choose icing colors inspired by nature. Soft browns, greens, and creams work well. Use a thin layer of icing to keep the wood texture visible. Try simple leaf or flower shapes for decoration. Add a sprinkle of cinnamon or nutmeg for extra flavor and aroma.
Using Edible Paints
Edible paints add a delicate touch without heavy coverage. Mix food coloring with a little water for soft shades. Paint gentle patterns like branches, berries, or dots. Allow the paint to dry fully before handling. This method highlights the cookie’s natural surface.
Adding Texture And Details
Texture creates depth and interest on wood cookies. Use piping bags for fine lines or dots. Press small edible beads or sugar crystals into the icing. Create bark-like patterns with a toothpick or fork. These small details make each cookie unique and inviting.
Storing And Serving
Storing and serving wood cookie molds properly keeps them fresh and tasty. These steps protect the cookies from drying out or becoming stale. Serving ideas help make your wood cookie molds a hit at any gathering.
Best Storage Methods
Store wood cookie molds in an airtight container. Use a cool, dry place away from sunlight. Wrap cookies in parchment paper before placing them in the container. Avoid storing in the fridge to keep texture soft. For longer storage, freeze cookies in a sealed bag. Thaw at room temperature before serving.
Shelf Life Expectations
Wood cookie molds stay fresh for about 5 days at room temperature. In an airtight container, they keep their softness and flavor. Frozen cookies last up to 3 months without losing quality. Check for any change in smell or texture before eating. Freshness ensures the best taste and enjoyment.
Creative Serving Suggestions
Serve wood cookie molds with fresh fruit or whipped cream. Use them as a base for mini desserts or ice cream sandwiches. Arrange cookies on a wooden board for a rustic look. Pair with tea or coffee for a cozy treat. Add a sprinkle of powdered sugar for extra charm.
Credit: underatinroof.com
Troubleshooting Common Issues
Troubleshooting common issues with wood cookie mold recipes helps improve baking results. Small problems can stop cookies from turning out perfect. Understanding common mistakes saves time and effort. Fixing these issues makes baking more fun and rewarding.
Dough Too Sticky Or Dry
Sticky dough sticks to the mold and is hard to shape. Add a little flour to fix stickiness. Dry dough cracks and does not hold well. Add small amounts of water or milk to soften it. Mix dough slowly to get the right texture. Test by pressing dough gently; it should not stick or crumble.
Cookies Losing Shape
Cookies lose shape if dough is too warm. Chill dough before cutting shapes. Use cold butter for better form. Press dough firmly into the wood mold. Avoid over-handling the dough to keep shapes sharp. Bake cookies immediately after shaping to keep edges clear.
Baking Irregularities
Uneven baking causes cookies to burn or stay raw inside. Use an oven thermometer to check temperature. Place cookies in the center of the oven for even heat. Rotate the baking tray halfway through cooking. Use parchment paper to prevent sticking. Follow baking time in the recipe closely.
Frequently Asked Questions
What Ingredients Are Needed For Wood Cookie Mold Recipe?
You need flour, sugar, butter, eggs, and vanilla extract. Add baking powder and salt for texture and flavor. These basic ingredients create the perfect dough for wood cookie molds.
How To Prepare Dough For Wood Cookie Molds?
Mix dry ingredients first, then add wet ingredients slowly. Knead until smooth and firm, not sticky. Chill dough for 30 minutes before shaping into wood cookie molds.
Can I Use Different Flavors In Wood Cookie Mold?
Yes, you can add cocoa powder, cinnamon, or nutmeg. Vanilla or almond extract enhances flavor too. Experiment with spices for unique wood cookie mold tastes.
How Long To Bake Wood Cookie Mold Cookies?
Bake at 350°F (175°C) for 8-12 minutes. Cookies should be golden at edges but soft inside. Baking time varies with cookie thickness and oven type.
Conclusion
Creating wood cookie molds is fun and simple. You only need a few ingredients and basic steps. This recipe helps you make beautiful, natural-looking cookies at home. Try different shapes and sizes for variety. Baking these treats can bring joy to any occasion.
Enjoy sharing them with friends and family. Give this recipe a try and see the results yourself. Cooking can be easy and rewarding. Keep experimenting and have fun in the kitchen!