

If you’ve ever dreamed of baking bread that fills your home with a warm, tangy aroma, a Vermont sourdough recipe is exactly what you need. This recipe is simple, natural, and full of flavor — perfect for anyone who wants to create delicious, homemade bread without complicated steps.
Imagine slicing into a crusty loaf with a soft, chewy inside that’s made from just a few wholesome ingredients. Ready to master your own Vermont sourdough and impress your family or friends? Keep reading, and you’ll discover how easy and rewarding it can be.

Credit: www.everopensauce.com
Ingredients For Vermont Sourdough
Making Vermont sourdough starts with simple, quality ingredients. Each part plays a role in the bread’s flavor and texture. Choosing the right ingredients ensures a loaf that is both tasty and authentic.
The recipe calls for specific flours, a healthy starter, and a few extra items. These ingredients work together to create the classic Vermont sourdough taste. Understanding each one helps you bake with confidence.
Essential Flours
White bread flour forms the dough’s main structure. It has the right protein to create a chewy texture. Whole wheat flour adds depth and a nutty flavor. Some recipes use rye flour for a subtle tang. These flours blend to give Vermont sourdough its unique character.
Starter Essentials
The starter is the heart of sourdough. Made from flour and water, it captures wild yeast and bacteria. A strong starter brings life to the dough. It must be fed regularly to stay active. Using a mature starter ensures good rise and flavor.
Additional Ingredients
Water hydrates the flour and activates the starter. Salt controls fermentation and boosts flavor. Some bakers add a touch of sugar to help the yeast. Olive oil or butter is rarely used in Vermont sourdough, keeping the bread simple and rustic. Each ingredient has a clear purpose in the recipe.
Preparing The Sourdough Starter
The sourdough starter is the heart of your Vermont sourdough bread. It is a natural mix of flour and water that captures wild yeast and good bacteria from the environment. This mix helps your bread rise and gives it a unique tangy flavor. Preparing the starter takes a few days but is simple and rewarding.
Patience and care are key. You will feed the starter regularly and watch it grow stronger. This process creates a lively culture that makes your bread fluffy and tasty.
Mixing And Feeding
Start by mixing equal parts of flour and water in a clean jar. Use whole wheat or rye flour for best results. Stir the mixture well until smooth. Cover the jar loosely to let air in but keep dust out.
Feed your starter every 24 hours. Remove half of the mixture and add fresh flour and water in the same amount. Stir well. This feeding keeps the yeast active and growing. Keep the jar at room temperature for a few days.
Signs Of Readiness
Look for bubbles on the surface and throughout the starter. This shows the yeast is active and producing gas. The starter should rise and fall like a sponge. It will have a pleasant sour smell, not bad or moldy.
When the starter doubles in size within 4 to 6 hours after feeding, it is ready to use. This means it has enough strength to leaven your bread. Use the starter to bake or store it in the fridge for later feeding.
Mixing The Dough
Mixing the dough is the first step to making delicious Vermont sourdough bread. This part sets the base for the bread’s texture and flavor. Careful mixing helps the dough develop strength and hold gas during fermentation. It also ensures the ingredients blend well for even fermentation.
Understanding the mixing process will give you better control over your dough. Let’s explore the key stages in this process.
Combining Ingredients
Start by measuring your flour, water, salt, and sourdough starter precisely. Pour the flour into a large bowl. Add the sourdough starter and water next. Stir gently with a spoon or your hand to mix them well. At this stage, the dough looks rough and shaggy. The salt should be added last to avoid slowing fermentation. Mixing ingredients evenly helps the dough form a good structure.
Autolyse Process
Autolyse means letting the flour and water rest before adding salt and starter. After initial mixing, cover the dough and let it sit for 20 to 60 minutes. This rest helps flour absorb water fully. It also starts gluten development naturally. The dough becomes softer and easier to work with. Autolyse improves the bread’s texture and crumb. Skip it, and the dough might feel stiff and less elastic.
Kneading And Folding Techniques
Kneading and folding are key steps in making Vermont sourdough bread. These techniques help develop gluten, which gives the bread its chewy texture. Proper kneading and folding create a dough that is smooth and elastic.
Understanding these methods improves dough strength and shape. It also helps trap air, making the bread light and airy. Both beginners and experienced bakers benefit from practicing these simple techniques.
Basic Kneading Tips
Start by pressing the dough with the heel of your hand. Push it away, then fold it back over. Turn the dough slightly and repeat this motion.
Keep your movements steady and gentle. Avoid tearing the dough. Knead until the dough feels smooth and springs back when poked.
Use a clean, lightly floured surface to prevent sticking. Kneading usually takes about 8 to 10 minutes. Stop if the dough becomes too sticky or tough.
Stretch And Fold Method
This technique is gentle and helps keep the dough airy. Stretch one side of the dough upward, then fold it over the center. Turn the dough 90 degrees and repeat.
Do this process every 20 to 30 minutes during the first few hours of fermentation. It helps strengthen the dough without heavy kneading.
Use wet hands to prevent sticking. The dough will feel looser but becomes stronger with each fold. This method suits high-hydration sourdoughs well.
Bulk Fermentation Tips
Bulk fermentation is a key step in making Vermont sourdough bread. It helps develop flavor and texture. Proper care during this stage improves the dough’s rise and crumb. Follow these tips to get the best results.
Ideal Temperature
The dough ferments best at a warm, stable temperature. Aim for 75°F to 78°F (24°C to 26°C). Cooler temps slow fermentation. Warmer temps speed it up but risk over-proofing. Use a warm spot in your kitchen, away from drafts. A proofing box or warm oven light can help maintain steady heat.
Timing And Patience
Bulk fermentation usually takes 3 to 5 hours. Watch the dough, not the clock. Look for signs like dough doubling in size and small bubbles on the surface. Avoid rushing. Under-fermented dough feels tight and dense. Over-fermented dough becomes slack and hard to shape. Patience brings good flavor and a light crumb.

Credit: www.kingarthurbaking.com
Shaping The Loaf
Shaping the loaf is an important step in making Vermont sourdough. It helps the dough keep its form and rise well during baking. Good shaping gives the bread a nice texture and a beautiful crust.
Taking time to shape the dough carefully can improve the final bread. It also helps create even air bubbles inside the loaf. This makes the sourdough soft and chewy.
Pre-shape Steps
Start by gently taking the dough out of the bowl. Place it on a clean, lightly floured surface. Use your hands to fold the dough into a round shape. Let it rest for 15 to 20 minutes. This rest helps the gluten relax and makes final shaping easier.
Final Shaping
After resting, shape the dough into its final form. For a round loaf, tuck the edges under to make a tight ball. Use your hands to create surface tension by pulling the dough towards you. This tight surface helps the loaf hold its shape. Place the shaped dough into a floured banneton or bowl. Cover it and let it rise before baking.
Proofing The Dough
Proofing the dough is a key step in making Vermont sourdough. This process lets the yeast and bacteria grow, creating flavor and texture. Proper proofing helps the dough rise and develop its unique sour taste. Understanding proofing methods can improve your bread’s quality.
Room Temperature Proofing
Room temperature proofing is the classic way to let dough rise. Keep the dough in a warm spot, about 70°F (21°C). This speed helps the yeast activate and produce gas quickly. Usually, it takes 3 to 5 hours for the dough to double in size. Cover the dough with a cloth to keep moisture in. This method gives a good rise and a mild sour flavor.
Cold Fermentation Benefits
Cold fermentation means proofing dough in the fridge. The dough rises slowly at 38°F (3°C) or lower. This slow rise helps develop deeper, complex flavors. The dough also becomes easier to handle and shape. Cold fermentation can last from 12 to 48 hours. This method boosts the dough’s sourness and improves texture. It’s a great choice for a tastier Vermont sourdough.
Baking Techniques
Baking sourdough bread requires special techniques to get the perfect crust and crumb. Each step helps build flavor and texture. Understanding these methods improves your baking results.
Simple tools and careful timing can make a big difference. Pay attention to how you prepare your oven, bake your bread, and score the dough before baking.
Oven Setup
Preheat your oven to a high temperature, usually around 450°F (232°C). A hot oven helps create a strong rise and a crispy crust. Place a baking stone or heavy tray inside to hold heat well.
Adding steam during the first part of baking keeps the crust soft. Use a pan with water or spray the oven walls with water. This technique helps the bread expand before the crust hardens.
Using A Dutch Oven
A Dutch oven traps steam inside, creating a perfect baking environment. Preheat it in the oven before placing the dough inside. The tight lid keeps moisture close to the bread.
After 20 minutes, remove the lid to let the crust brown and become crunchy. Baking in a Dutch oven gives sourdough a beautiful shape and crust.
Scoring The Bread
Scoring means cutting shallow slashes on the dough surface. Use a sharp knife or a razor blade. This guides the bread to expand without cracking randomly.
Make quick, confident cuts. Different patterns change the bread’s look. Scoring also lets steam escape, improving the final texture.
Cooling And Storing
Cooling and storing Vermont sourdough bread correctly keeps it fresh and tasty. Proper cooling helps the bread finish baking inside and prevents sogginess. Good storage keeps the bread soft and stops it from drying out.
Proper Cooling Methods
Take the bread out of the oven and place it on a wire rack. This lets air flow around the bread. Avoid wrapping the bread while it is hot. Hot steam trapped inside makes the crust soft. Cool the bread for at least one hour. The inside needs time to set fully.
Storage Tips For Freshness
Store sourdough in a paper bag or a cloth bread bag. These materials keep the crust crisp and the inside moist. Avoid plastic bags because they trap moisture and soften the crust. Keep the bread at room temperature. Do not refrigerate it; this dries the bread faster. For longer storage, slice and freeze the bread in a sealed bag. Toast slices directly from the freezer for best taste.
Troubleshooting Common Issues
Troubleshooting common issues in your Vermont sourdough baking helps improve your bread. Problems like dense crumb, lack of rise, or overproofing can happen. Understanding these signs lets you fix the dough early. This way, your sourdough turns out soft and airy every time.
Dense Crumb
A dense crumb means your bread feels heavy inside. This happens if the dough does not ferment enough. It may also mean you used too much flour. Make sure to measure ingredients carefully. Knead the dough well to develop gluten. Give the dough enough time to rise. Avoid adding too much flour during shaping. The dough should feel soft and slightly sticky.
Lack Of Rise
Lack of rise makes the bread flat and hard. This occurs when the starter is weak or inactive. Feed your starter regularly to keep it strong. Use warm water to help activate yeast. Cold dough slows down fermentation. Check room temperature during rising; it should be warm but not hot. Avoid rushing the rising time. Patience helps the dough grow and become light.
Overproofing Signs
Overproofing means the dough rises too long. It looks very puffy and may collapse when touched. This causes large holes or a sunken top. To prevent this, watch your dough carefully. Test it by gently pressing with a finger. If the dough springs back slowly, it is ready to bake. If it does not spring back, it is overproofed. Bake immediately or reduce rising time next time.
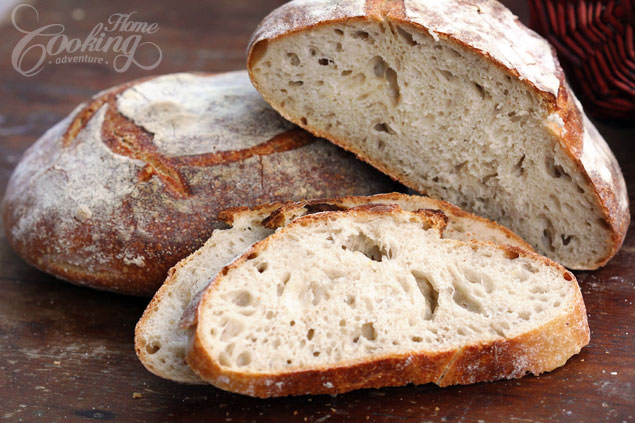
Credit: www.homecookingadventure.com
Frequently Asked Questions
What Makes Vermont Sourdough Bread Unique?
Vermont sourdough bread is known for its mild tang and soft texture. It uses a natural starter, giving it a distinct flavor. The traditional method involves slow fermentation, enhancing its taste and digestibility. This bread pairs well with many dishes and is a favorite in artisan baking.
How Do You Create A Vermont Sourdough Starter?
To create a Vermont sourdough starter, mix equal parts flour and water. Let it sit at room temperature. Feed it daily with fresh flour and water. After about 5-7 days, it will become bubbly and ready for baking. This starter is essential for authentic Vermont sourdough.
Can Vermont Sourdough Be Made Gluten-free?
Traditional Vermont sourdough uses wheat flour, which contains gluten. However, gluten-free versions can be made using alternative flours like rice or buckwheat. The fermentation process differs slightly. For best results, use a gluten-free starter and adjust hydration accordingly to mimic the original texture and flavor.
How Long Does Vermont Sourdough Fermentation Take?
Vermont sourdough fermentation typically takes 12 to 24 hours. The slow rise allows natural yeast to develop flavor and texture. Temperature affects timing; warmer conditions speed up fermentation. Patience is key for a well-risen loaf with complex taste and good crumb structure.
Conclusion
Baking Vermont sourdough is simple and fun. The recipe brings fresh, tasty bread to your table. You can enjoy warm slices with butter or jam. This bread fits well with many meals. Practice makes perfect, so keep baking often. Soon, you will feel proud of your bread.
Try this recipe and enjoy homemade sourdough today.